在微服务架构中,根据业务来拆分成一个个的服务,服务与服务之间可以相互调用(RPC),在Spring Cloud可以用RestTemplate+Ribbon和Feign来调用。为了保证其高可用,单个服务通常会集群部署。由于网络原因或者自身的原因,服务并不能保证100%可用,如果单个服务出现问题,调用这个服务就会出现线程阻塞,此时若有大量的请求涌入,Servlet容器的线程资源会被消耗完毕,导致服务瘫痪。服务与服务之间的依赖性,故障会传播,会对整个微服务系统造成灾难性的严重后果,这就是服务故障的“雪崩”效应。
为了解决这个问题,业界提出了断路器模型。
一、断路器简介
Netflix has created a library called Hystrix that implements the circuit breaker pattern. In a microservice architecture it is common to have multiple layers of service calls.
. —-摘自官网
Netflix开源了Hystrix组件,实现了断路器模式,SpringCloud对这一组件进行了整合。 在微服务架构中,一个请求需要调用多个服务是非常常见的,如下图:
较底层的服务如果出现故障,会导致连锁故障。当对特定的服务的调用的不可用达到一个阀值(Hystric 是5秒20次) 断路器将会被打开。

断路打开后,可用避免连锁故障,fallback方法可以直接返回一个固定值。
二、准备工作
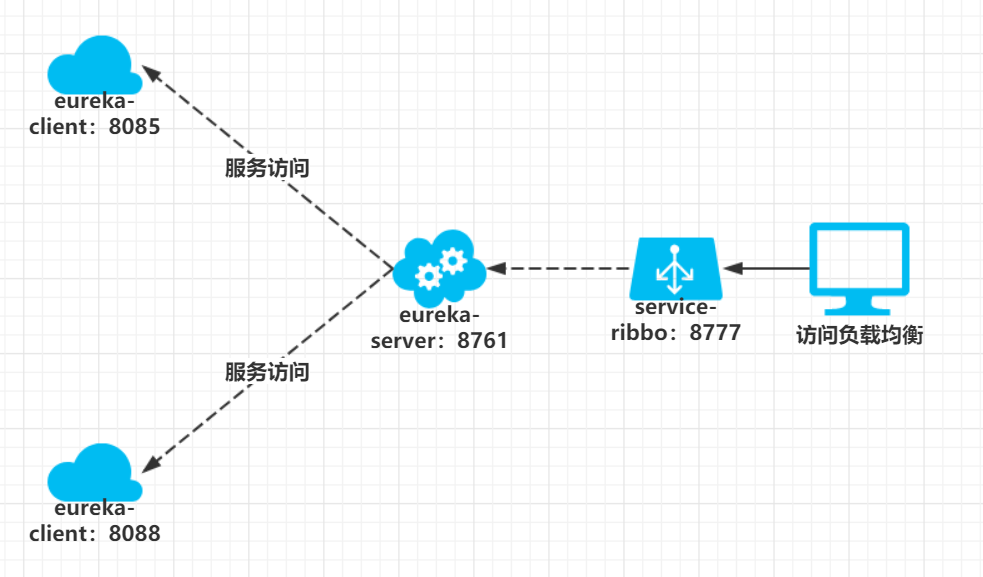
这篇文章基于上一篇文章的工程,首先启动上一篇文章的工程,启动eureka-server 工程;启动service-hi工程,它的端口为8762。
三、在ribbon使用断路器
改造serice-ribbon 工程的代码,首先在pox.xml文件中加入spring-cloud-starter-hystrix的起步依赖:
        <!--hystirx 熔断 G版不指定version似乎识别不了-->
        <dependency>
            <groupId>org.springframework.cloud</groupId>
            <artifactId>spring-cloud-starter-hystrix</artifactId>
            <version>1.1.7.RELEASE</version>
        </dependency>
在程序的启动类ServiceRibbonApplication 加@EnableHystrix注解开启Hystrix:
package com.example.serviceribbon;

import org.springframework.boot.SpringApplication;
import org.springframework.boot.autoconfigure.SpringBootApplication;
import org.springframework.cloud.client.discovery.EnableDiscoveryClient;
import org.springframework.cloud.client.loadbalancer.LoadBalanced;
import org.springframework.cloud.netflix.hystrix.EnableHystrix;
import org.springframework.context.annotation.Bean;
import org.springframework.web.client.RestTemplate;
@EnableHystrix   //2.0
@EnableDiscoveryClient
@SpringBootApplication
public class ServiceRibbonApplication {

    public static void main(String[] args) {
        SpringApplication.run(ServiceRibbonApplication.class, args);
    }

    /**
     * @Bean :初始化,可以被HelloService  @Autowired
     * @LoadBalanced :表示启动负载均衡
     * @return
     */
    @Bean
    @LoadBalanced
    RestTemplate restTemplate() {
        return new RestTemplate();
    }
}
改造HelloService类,在hello方法上加上@HystrixCommand注解。该注解对该方法创建了熔断器的功能,并指定了fallbackMethod熔断方法,熔断方法直接返回了一个字符串,字符串为”sry, mr “+name +” I can not connect to server .”,代码如下:
package com.example.serviceribbon.service;

import com.netflix.hystrix.contrib.javanica.annotation.HystrixCommand;
import org.springframework.beans.factory.annotation.Autowired;
import org.springframework.stereotype.Service;
import org.springframework.web.client.RestTemplate;

@Service
public class HelloService {

    @Autowired
    RestTemplate restTemplate;

    @HystrixCommand(fallbackMethod = "helloError")
    public String hello(String name) {
        return restTemplate.getForObject("http://eureka-client/hello?name=" + name, String.class);
    }


    public String helloError(String name){
        return "sry, mr "+name +" I can not connect to server .";
    }
}
启动:service-ribbon 工程,当我们访问http://localhost:8777/helloRibbon?name=RibbonHy,浏览器显示:
hi RibbonHy , welcome to learning SpringCloud ! I am from port 8085
此时关闭 eureka-client工程,当我们再访问http://localhost:8777/helloRibbon?name=RibbonHy,浏览器会显示:
sry, mr RibbonHy I can not connect to server .
这就说明当 eureka-client工程不可用的时候,service-ribbon调用 service-hi的API接口时,会执行快速失败,直接返回一组字符串,而不是等待响应超时,这很好的控制了容器的线程阻塞。
四、Feign中使用断路器
Feign是自带断路器的,在Greenwich版本的Spring Cloud中,它没有默认打开。需要在配置文件中配置打开它,在配置文件加以下代码:
server:
  port: 8787
spring:
  application:
    name: service-feign
eureka:
  client:
    serviceUrl:
      defaultZone: http://localhost:8761/eureka
feign:
  hystrix:
    enabled: true
基于service-feign工程进行改造,只需要在FeignClient的FeignServiceHi接口的注解中加上fallback的指定类就行了:
package com.example.sericefeign.service;

import org.springframework.cloud.openfeign.FeignClient;
import org.springframework.web.bind.annotation.GetMapping;
import org.springframework.web.bind.annotation.RequestParam;

@FeignClient(value = "eureka-client",fallback = FeignServiceHiHystric.class)
public interface FeignServiceHi {

    @GetMapping("/hello")
     String hi(@RequestParam String name);

}
FeignServiceHiHystric需要实现FeignServiceHi接口,并注入到Ioc容器中,代码如下:
package com.example.sericefeign.service;

import org.springframework.stereotype.Component;

@Component
public class FeignServiceHiHystric implements FeignServiceHi {
    @Override
    public String hi(String name) {
        return "soryy"+ name;
    }
}
启动eureka-service工程,servcie-feign工程以及eureka-client工程,浏览器打开http://localhost:8787/helloFeign?name=feignHy,注意此时service-hi工程没有启动,网页显示:
hi feignHy , welcome to learning SpringCloud ! I am from port 8085
停止eureka-client工程,再次访问,浏览器显示:
oh no,the connection 不能连接 feignHy
这证明断路器起到作用了。
如果沒有开启
feign:
  hystrix:
    enabled: false
则出现:
Whitelabel Error Page
This application has no explicit mapping for /error, so you are seeing this as a fallback.
Sun May 26 13:01:30 CST 2019
There was an unexpected error (type=Internal Server Error, status=500).
connect timed out executing GET http://eureka-client/hello?name=feignHy
五、Hystrix Dashboard (断路器:Hystrix 仪表盘)
基于service-ribbon改造,feign的改造和这一样。
首选在pom.xml引入spring-cloud-starter-hystrix-dashboard的起步依赖:
        <!--hystrix dashboard 3.0-->
        <dependency>
            <groupId>org.springframework.boot</groupId>
            <artifactId>spring-boot-starter-actuator</artifactId>
        </dependency>
        <dependency>
            <groupId>org.springframework.cloud</groupId>
            <artifactId>spring-cloud-starter-hystrix-dashboard</artifactId>
            <version>1.1.7.RELEASE</version>
        </dependency>
在主程序启动类中加入@EnableHystrixDashboard注解,开启hystrixDashboard:
以下是D版的写法:
@SpringBootApplication
@EnableDiscoveryClient
@EnableHystrix
@EnableHystrixDashboard
public class ServiceRibbonApplication {

	public static void main(String[] args) {
		SpringApplication.run(ServiceRibbonApplication.class, args);
	}

	@Bean
	@LoadBalanced
	RestTemplate restTemplate() {
		return new RestTemplate();
	}

}
但是最新的G版需要如下:
package com.example.serviceribbon;

import com.netflix.hystrix.contrib.metrics.eventstream.HystrixMetricsStreamServlet;
import org.springframework.boot.SpringApplication;
import org.springframework.boot.autoconfigure.SpringBootApplication;
import org.springframework.boot.web.servlet.ServletRegistrationBean;
import org.springframework.cloud.client.discovery.EnableDiscoveryClient;
import org.springframework.cloud.client.loadbalancer.LoadBalanced;
import org.springframework.cloud.netflix.hystrix.EnableHystrix;
import org.springframework.cloud.netflix.hystrix.dashboard.EnableHystrixDashboard;
import org.springframework.context.annotation.Bean;
import org.springframework.web.client.RestTemplate;

@EnableHystrix
@EnableHystrixDashboard
@EnableDiscoveryClient
@SpringBootApplication
public class ServiceRibbonApplication {

    public static void main(String[] args) {
        SpringApplication.run(ServiceRibbonApplication.class, args);
    }

    /**
     * @return
     * @Bean :初始化,可以被HelloService  @Autowired
     * @LoadBalanced :表示启动负载均衡
     */
    @Bean
    @LoadBalanced
    RestTemplate restTemplate() {
        return new RestTemplate();
    }

    @Bean
    public ServletRegistrationBean getServlet(){
        HystrixMetricsStreamServlet streamServlet = new HystrixMetricsStreamServlet();
        ServletRegistrationBean registrationBean = new ServletRegistrationBean(streamServlet);
        registrationBean.setLoadOnStartup(1);
        registrationBean.addUrlMappings("/hystrix.stream");
        registrationBean.setName("HystrixMetricsStreamServlet");
        return registrationBean;
    }
}
打开浏览器:访问http://localhost:8777/hystrix,界面如下:
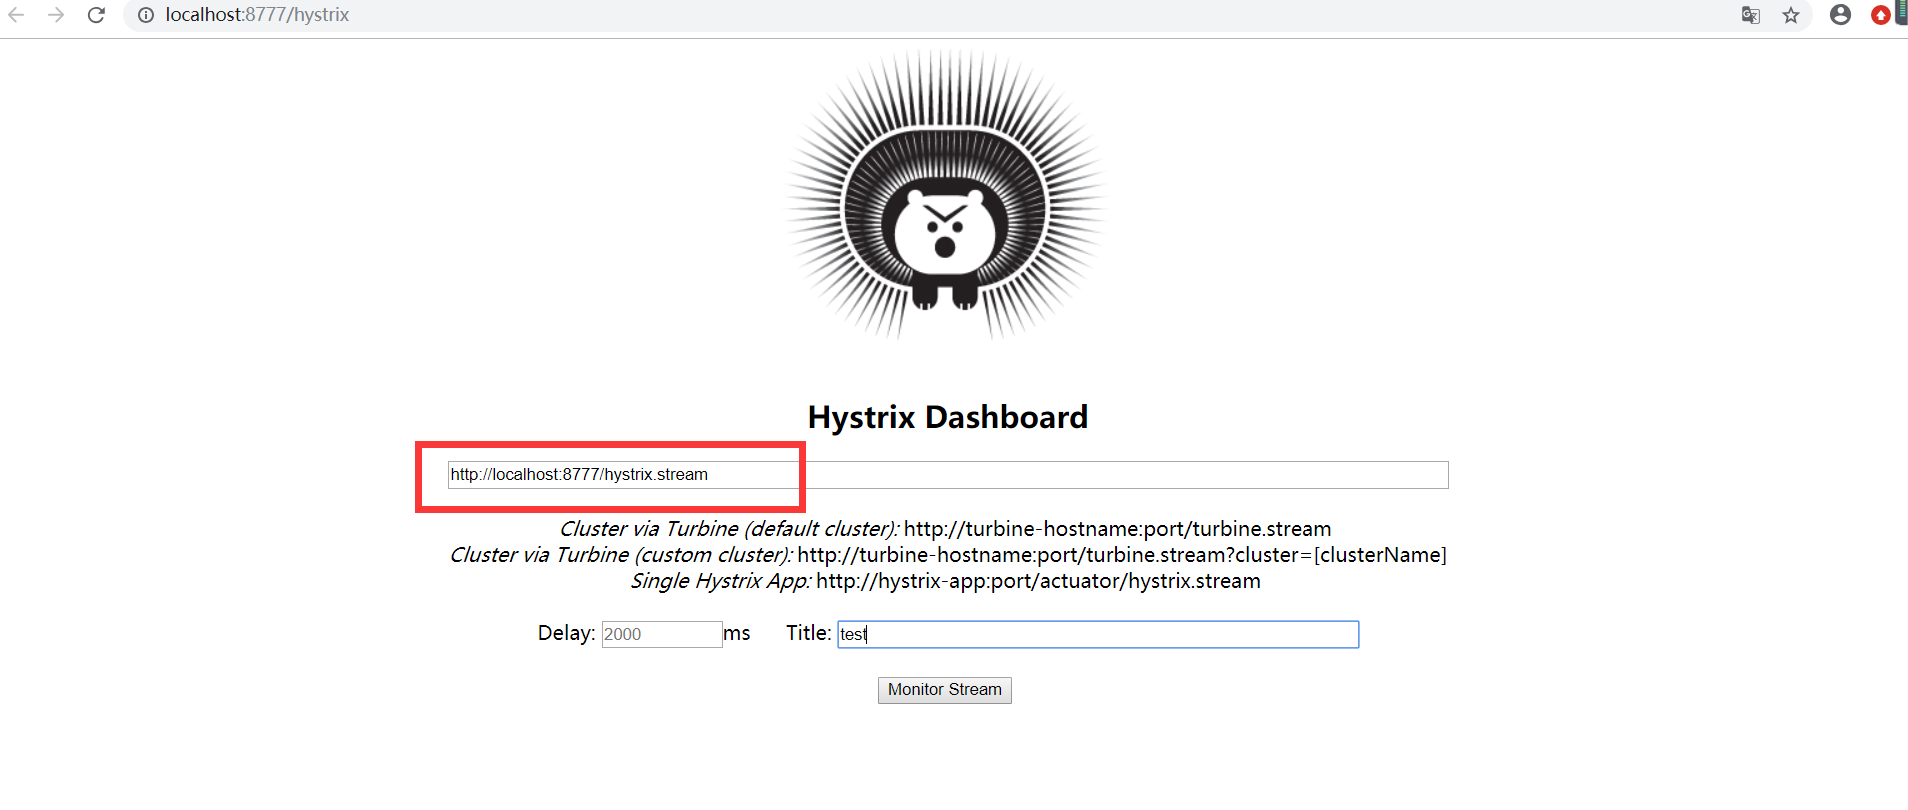
输入:http://localhost:8777/hystrix.stream
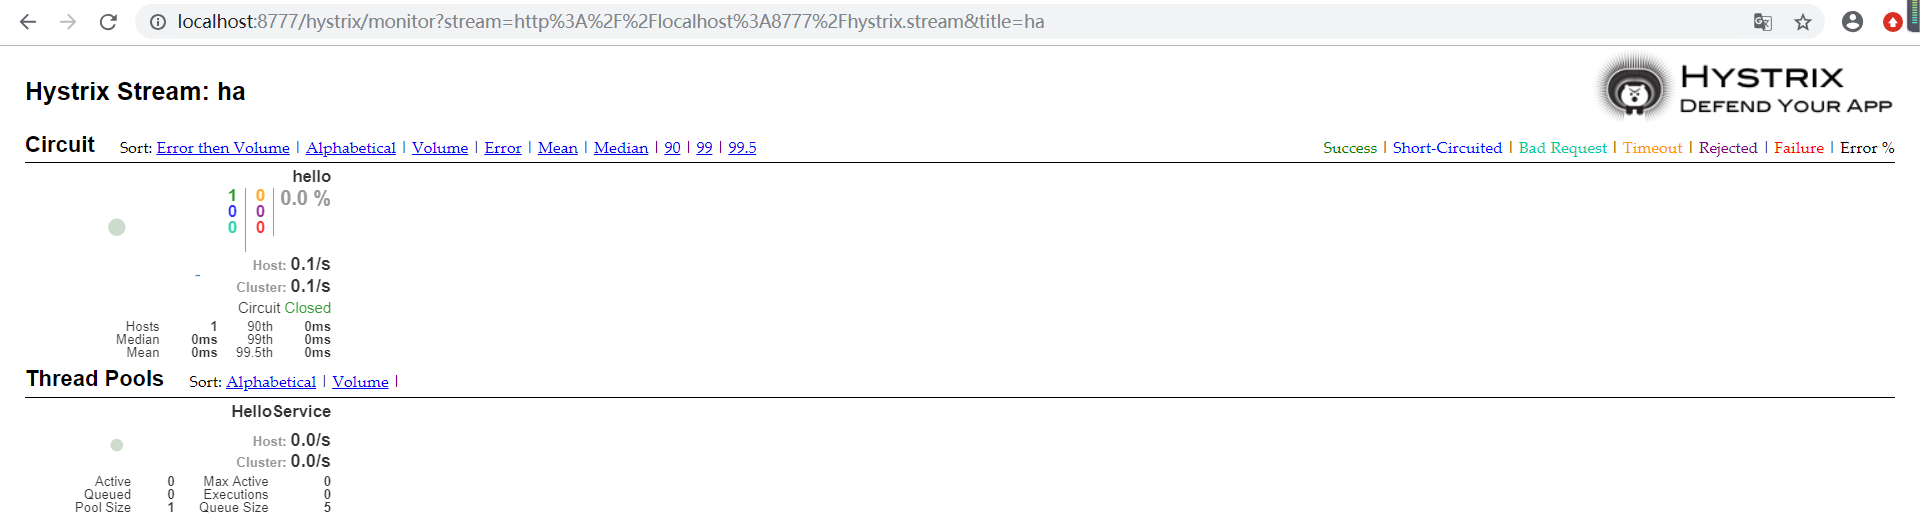
点击monitor stream,进入下一个界面,访问:http://localhost:8777/helloRibbon?name=RibbonHy
此时会出现监控界面:
feign的原理一样:
已经在代码中添加此处不再赘述
本文源码下载:https://github.com/chanxinguidao/SpringCloudLearning/tree/master/chapter4